add filter for featured image to show in listings mylisting27

add_filter( ‘mylisting\listing\share\image’, function( $image, $listing ) {
$image = get_the_post_thumbnail_url( $listing->get_id(), ‘full’ ); // Ottenere l’URL dell’immagine in primo piano
if ( $image && filter_var( $image, FILTER_VALIDATE_URL ) !== false ) {
$image = esc_url( $image );
}
return $image;
}, 99, 2 );


add in functions.php child theme

COME AGGIUNGERE CAMPI AL LOGIN FORM DI WOOCOMMERCE

Ci sono tre parti di codice da aggiungere in fondo al functions.php del tema

La prima parte del codice serve per creare i campi che andremo ad aggiungere. In questo caso ci saranno nome, cognome e numero di telefono.
function wooc_extra_register_fields() {?>
       <p class="form-row form-row-wide">
       <label for="reg_billing_phone"><?php _e( 'Phone', 'woocommerce' ); ?></label>
       <input type="text" class="input-text" name="billing_phone" id="reg_billing_phone" value="<?php esc_attr_e( $_POST['billing_phone'] ); ?>" />
       </p>
       <p class="form-row form-row-first">
       <label for="reg_billing_first_name"><?php _e( 'First name', 'woocommerce' ); ?><span class="required">*</span></label>
       <input type="text" class="input-text" name="billing_first_name" id="reg_billing_first_name" value="<?php if ( ! empty( $_POST['billing_first_name'] ) ) esc_attr_e( $_POST['billing_first_name'] ); ?>" />
       </p>
       <p class="form-row form-row-last">
       <label for="reg_billing_last_name"><?php _e( 'Last name', 'woocommerce' ); ?><span class="required">*</span></label>
       <input type="text" class="input-text" name="billing_last_name" id="reg_billing_last_name" value="<?php if ( ! empty( $_POST['billing_last_name'] ) ) esc_attr_e( $_POST['billing_last_name'] ); ?>" />
       </p>
       <div class="clear"></div>
       <?php
 }
 add_action( 'woocommerce_register_form_start', 'wooc_extra_register_fields' );

A seguire inseriamo il codice per renderli obbligtori.
/**

* register fields Validating.

*/

function wooc_validate_extra_register_fields( $username, $email, $validation_errors ) {

      if ( isset( $_POST['billing_first_name'] ) && empty( $_POST['billing_first_name'] ) ) {

             $validation_errors->add( 'billing_first_name_error', __( '<strong>Error</strong>: First name is required!', 'woocommerce' ) );

      }

      if ( isset( $_POST['billing_last_name'] ) && empty( $_POST['billing_last_name'] ) ) {

             $validation_errors->add( 'billing_last_name_error', __( '<strong>Error</strong>: Last name is required!.', 'woocommerce' ) );

      }
         return $validation_errors;
}

add_action( 'woocommerce_register_post', 'wooc_validate_extra_register_fields', 10, 3 );
A seguire infine assegnamo questi dati nei DB di wordpress dicendogli di salfarli nel profilo dell’account ppena creato.
/**
* Below code save extra fields.
*/
function wooc_save_extra_register_fields( $customer_id ) {
    if ( isset( $_POST['billing_phone'] ) ) {
                 // Phone input filed which is used in WooCommerce
                 update_user_meta( $customer_id, 'billing_phone', sanitize_text_field( $_POST['billing_phone'] ) );
          }
      if ( isset( $_POST['billing_first_name'] ) ) {
             //First name field which is by default
             update_user_meta( $customer_id, 'first_name', sanitize_text_field( $_POST['billing_first_name'] ) );
             // First name field which is used in WooCommerce
             update_user_meta( $customer_id, 'billing_first_name', sanitize_text_field( $_POST['billing_first_name'] ) );
      }
      if ( isset( $_POST['billing_last_name'] ) ) {
             // Last name field which is by default
             update_user_meta( $customer_id, 'last_name', sanitize_text_field( $_POST['billing_last_name'] ) );
             // Last name field which is used in WooCommerce
             update_user_meta( $customer_id, 'billing_last_name', sanitize_text_field( $_POST['billing_last_name'] ) );
      }

}
add_action( 'woocommerce_created_customer', 'wooc_save_extra_register_fields' );

A questo punto dovrebbe funzionare tutto. Se vogliamo aggiungere un email per verificare l’indirizzo email utilizzato bisognerà aggiungere un plugin :

Woocommerce User Email Verification

Consiglio di usare l’opzione per includere il link nell’email di conferma di woocommerce quando un account viene creato cosi si fa tutto in uno.

LOGOUT DIRETTO WOOCOMMERCE LOGIN

Aggiungere questo codice al function.php del tema

/**
* Bypass logout confirmation.
*/
function iconic_bypass_logout_confirmation() {
global $wp;

if ( isset( $wp->query_vars[‘customer-logout’] ) ) {
wp_redirect( str_replace( ‘&amp;’, ‘&’, wp_logout_url( wc_get_page_permalink( ‘myaccount’ ) ) ) );
exit;
}
}

add_action( ‘template_redirect’, ‘iconic_bypass_logout_confirmation’ );

ZAPIER STRIPE

Accedere all’account cone le credenziali che si trovano nel canale #password di SLACK.

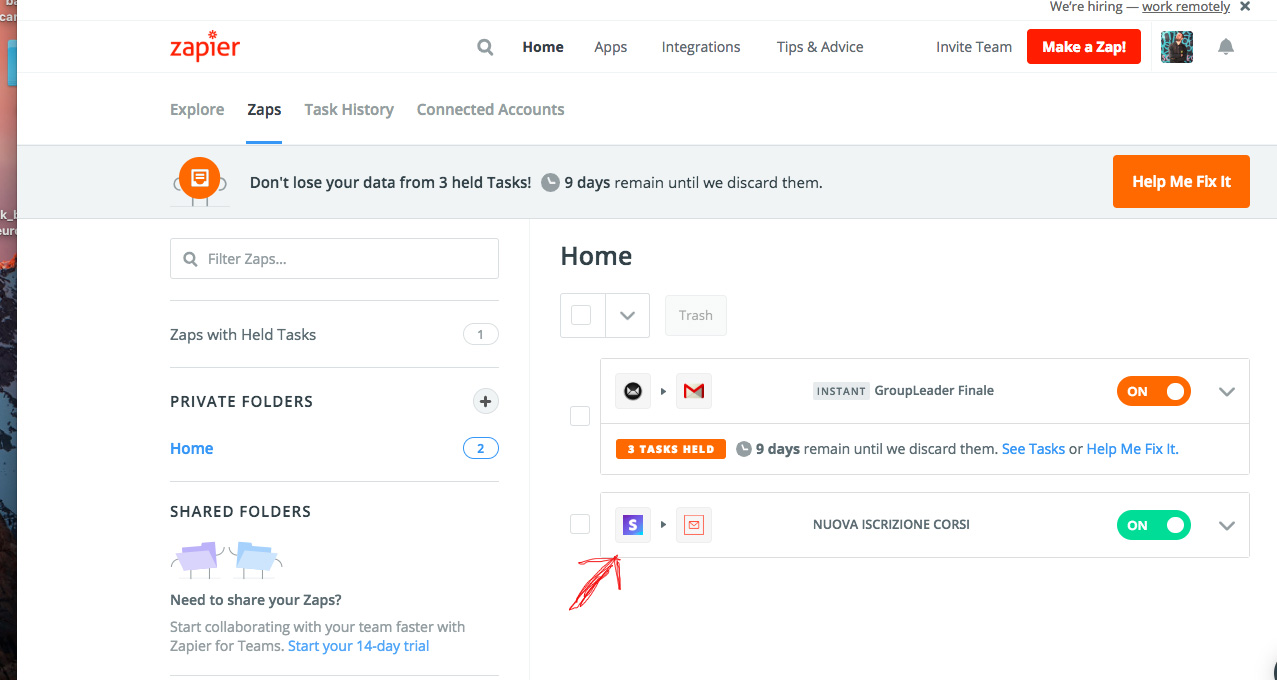
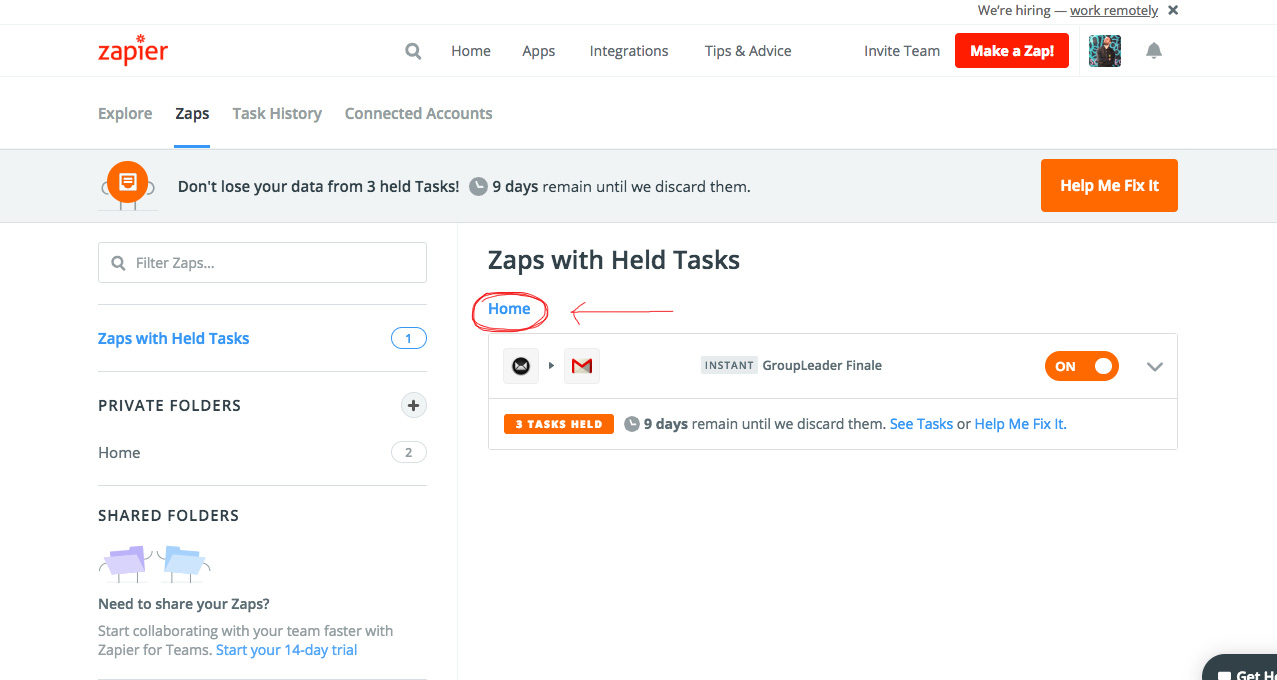
Una volta dentro andare su “Zaps” e cliccare su “home”:


A questo punto vedrete gli ZAPIER attivi che sono due. Cliccare sullo ZAPIER che ha STRIPE e li si potrà editare lo zap, cambiando e/o correggendo gli eventuali passaggi non funzionanti.

Serve la private license key di STRIPE, per connettere il nostro account, che si trova nella dashboard di STRIPE. Credenziali sempre in canale #password.

MyListing

Creare un listing globale per visualizzare tutto nella stessa mappa:

  1. Listing Types > Add new > Publish
  2. General > Advanced > check This is a global listing type
  3. Search forms > add some search filters that you use in all your listing types e.g. Location, in both Advanced and Basic form
  4. You can now use this listing type to display all listings in one map. Just add the “27 > Map” widget and select the global listing type you created.

Modificare lo slug “listing”

Settings > Permalinks > Listing base. You can’t change that for specific listings only though.

Modificare APPLY FOR JOB Jobify

La stringa in questione che andava modificata per Apply for job si trova qui: /home/admin/web/scambinternazionali.it/public_html/wp-content/themes/jobify/job_manager/job-application.php (non è la prima ma è la seconda)

Cambi sito ICYE

Cambiare gli slug di www.icye-italia.it/progetto/nome-progetto

Aggiungere il seguente codice nel file functions.php

add_filter(‘tourmaster_custom_post_slug’, ‘my_custom_slug_mod’, 10, 2);
function my_custom_slug_mod($slug, $type){
if( $type == ‘tour_category’ ){
return ‘categoria-progetto’;
} else if( $type == ‘tour’ ){
return ‘progetto’;
}
return $slug;
}

Togliere i commenti dagli articoli di testimonianza:

Aggiungere il seguente al foglio di stile css:

#comments {
display: none;
}

Modificare il modulo di contatto

Edit the files

1.) Go to include/tour-util.php file in (public_html/wp-content/plugins/tourmaster/tour/include). Upload this file2.) Around line 1195, you’ll see list of enquiry form fields.

$enquiry_fields = array( 
'full-name' => array( 
    'title' => esc_html__('Full Name', 'tourmaster'), 
    'type' => 'text', 
    'required' => true ), 
'email-address' => array( 
    'title' => esc_html__('Email Address', 'tourmaster'), 
    'type' => 'text', 
    'required' => true ), 
'your-enquiry' => array( 
    'title' => esc_html__('Your Enquiry', 'tourmaster'), 
    'type' => 'textarea', 
    'required' => true ),
);

3.) Try adding new field inside the array() as you want.
4.) The structure will be ( select the “type” as “text” or “textarea” and select the “required” to “true” or “false” )

'FIELD_NAME' => array( 
    'title' => esc_html__('FIELD_TITLE', 'tourmaster'), 
    'type' => 'textarea/text',  
    'required' => true/false ),

Update the language after tourmaster core plugin update

public_html/wp-content/plugins/tourmaster/languages

Update these files 

Modifying the mail

1.) Go to “Tourmaster plugin option > General > Enquiry E-mail Content” section
2.) use {FIELD_NAME} to replace the word you want with the data user’re filling.

Dear {full-name},
You have sumiited an enquiry from {tour-name}
Message: {your-enquiry}
Our team will contact you back via the email you provided, {email-address} 
Thank you!
Come utilizzare il plugin Autopublish

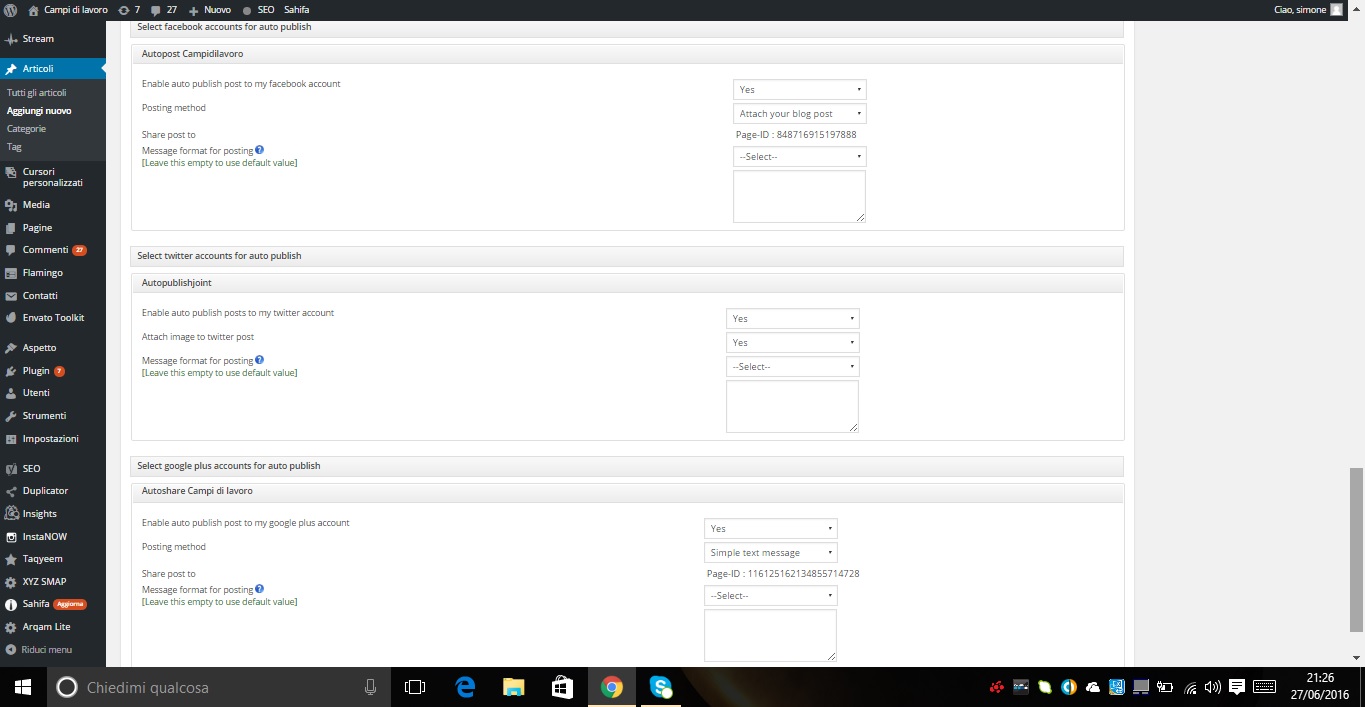
Il plugin dovrebbe essere abbastanza facile da utilizzare, sono già state programmate tutte le impostazioni di default (ovvero come deve apparire l’articolo che stiamo scrivendo sul social di turno) per cui bisogna solo aggiungere gli eventuali commenti ed hastag che vogliamo appaiano su ciascun social. Quando stiamo scrivendo un articolo troveremo in fondo alla stessa pagina questi tre box, ognuno dedicato ad un social.

Schermata uno


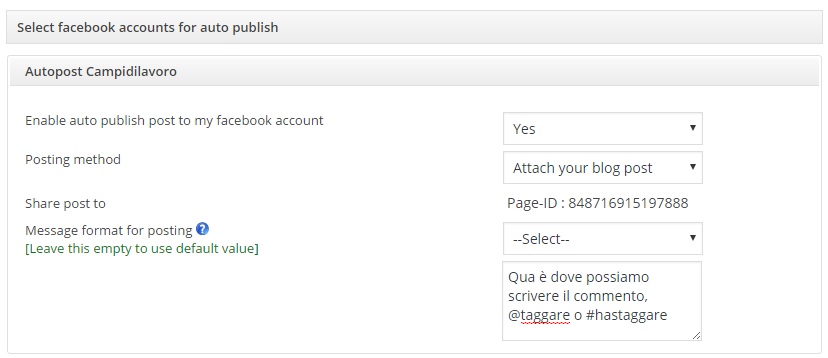
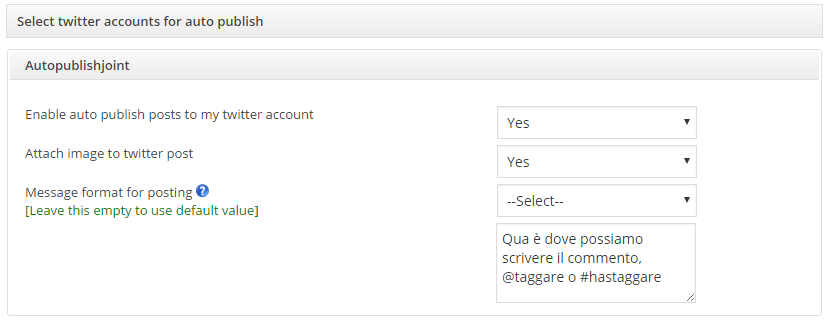
Bisogna accertarsi che tutti i menù a tendina riportino le voci che vediamo in immagine

Facebook:

Schermata FB2

Twitter:

schermata TW2

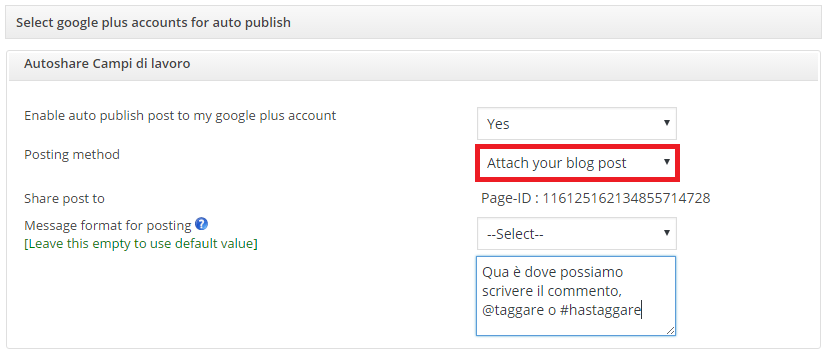
Google+:

schermata G+2

Facciamo attenzione alla voce “posting method” di Google+  perché a volte non rimane impostata.

L’ultimo box, come vediamo nelle immagini, è quello dedicato alla personalizzazione dei post.

Per programmare i post sui social basta programmare la pubblicazione degli articoli e accertarsi che tutti i box siano stati correttamente riempiti.

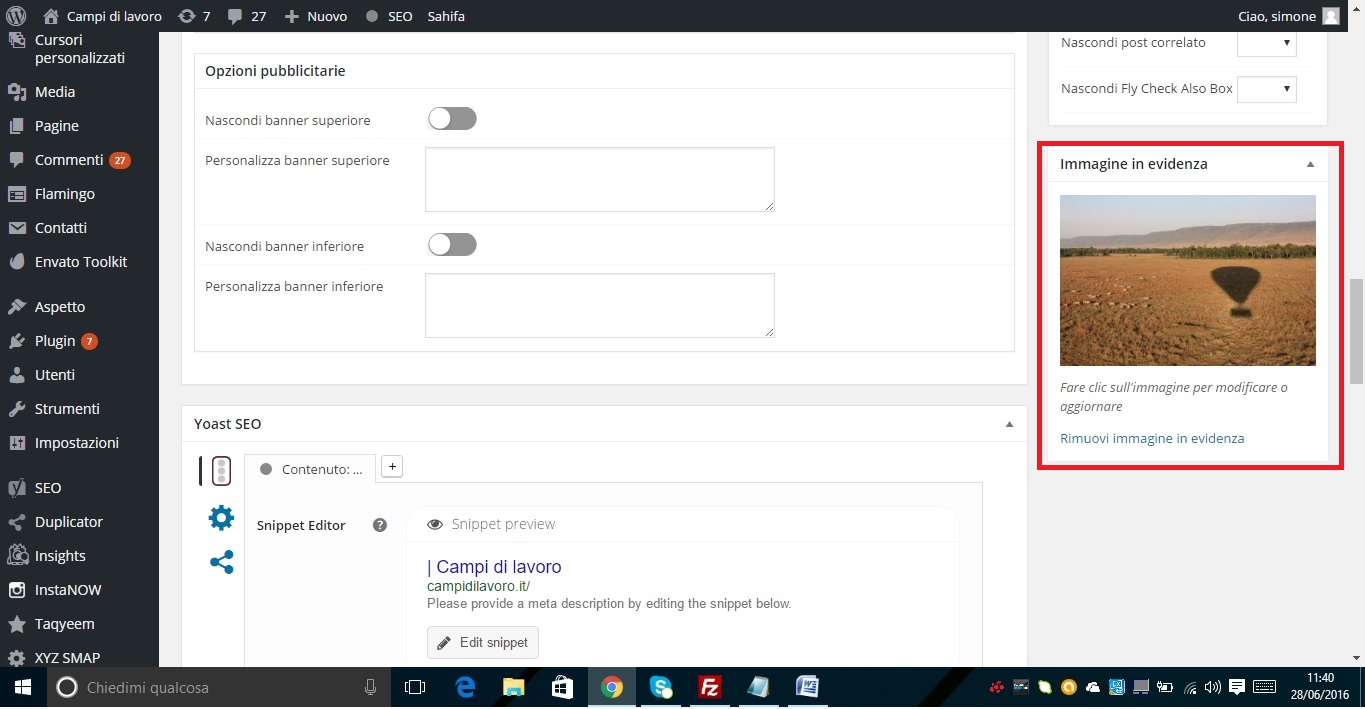
Ultima cosa, per essere sicuri che con il post compaia l’immagine che vogliamo, bisogna impostare sempre l’immagine in evidenza:

schermata

Buone condivisioni!